Macintosh HistoryPosts RSS Comments RSS

Archive for the 'Uncategorized' Category

PhoneNet PC card

I aquired a ISA PhoneNet PC card. Here are some pictures. There are manuals and software with it too!

I’m wondering? is there anyone with experiance with these cards? Will they work under Windows XP. And what about Linux. If under Linux I could maybe build my own AppleTalk / TCP/IP router???

Here are some pictures. There are manuals and software with it too. It has a DB-9 connector and a PhoneNet dongle. On the card number:
630-5306

DMA
FFC ID BCG9GRM2050
Apple Computer 1986/87
LocalTalk PC Card
Serial number: A90010662


Probaly this one… Found on:
http://www.vintagemacworld.com/pc_hardware.html

Apple LocalTalk PC Card

Apple’s official LocalTalk PC card: Half-size ISA card, contains a 6502 processor and Zilog 8530 controller. Set of eight dip swiches for setting IRQ and IO address. LocalTalk (RS-422 serial) interface is a 9 pin D socket, using the same LocalTalk/PhoneNet box as the Mac 128/512. Card is silk screened as “AppleTalk PC Card”, copyright date 1986. Model number 630-0113. The card labelled 630-5306 appears to be identical.

phonenetpc2

phonenetpc1

phonenetpcphonenetpc6phonenetpc3

Comments Off on PhoneNet PC card

800K eject motor failure

The eject motor of one of my 800k disk drives is broken. This mototr pulls the eject mechanism to the back and the disk will come out. Without the engine the disk is kept in the device and you have to get it out with a paperclip in the small hole in the front.

One of the small plastic gear wheels is broken. I have replaced the total motor of one of my spare drives, but I would like to repair it.  Did one of the members of the forum this before? Where to buy these kind of small parts? I tried in a shop with model trains, but no luck.

Here are some pictures so you know wheer I am talking about.

800k-unit-1


The disk unit with the motor. You have to remove the two screws (green) and d you can remove the motor. Don’t forget to remove the small connector too.

800k-motor


Here you see two motors. The top one is OK and the bottom one is the one which is broken. I’m missing the most right gear wheel. This one has two wheels. A smaller and a bigger in one wheel.

800k-eject-motor


Remove these three screws to open the motor.


BREAKING NEWS

A major break true came in december 2014. I got an email  It was short, but very clear:

Subject: Mac Floppy gear replacement parts

Saw your post…
I had the same issue. I created complete gear sets here:

https://www.shapeways.com/shops/vesperworks


Gear for Macintosh 512k Vintage Floppy Drive eject

This is a set of 4 identical replacement gears for Apple Macintosh 512k 400k/800k floppy drives EJECT MOTOR.

This is to replace the smallest gear of the eject motor, which typically goes brittle and breaks after several years of use. The original gears can no longer be found, and these 3D printed replicas are an exact match. These replicas are made of strong ultra-detail plastic. These have been tested and work great.

You may need to (manually!) use a 5/64″ drill bit to widen the orifice ever so slightly and make a perfect fit.

http://www.shapeways.com/model/2945293/gear-for-macintosh-512k-vintage-floppy-drive-eject.html

http://www.shapeways.com/model/2949685/gear-set-for-vintage-mac-400-800k-floppy-drives.html

Comments Off on 800K eject motor failure

Update SCSI disks PowerBook 100

After the advices of Trash80toHP_Mini and techknight I decided to open up my SCSI disks and give it a try to revive them. I couldn’t use them anyway.

I never opened up hard disks so everything was new for me. First of all..what to open. A close review showed that I should remove the sticker about warranty. After 20 years I don’t think it would matter :-). Second I had to remove 5 special shaped, so called tork screws on top of the disk. I had to use Tork screw driver 8 on the Conner 40 MB disks and Tork 6 on the 20 MB disks. On the picture you can see where to find them. If you have removed them use a very small normal screw driver to separate the top from the bottem. You can wrigle a little bit in the left or right corner and it will come lose.

hd2

If you have opend the disk you will see this inside:

hd

On the picture I have made some marks. I will explain.

To get live back into your disk you first have to inspect if the disk is clean. If not you can use a microfiber to clean. In my case the disks where perfectly clean. The disk is parked on the possition you see on the picture. If it starts it has to go to the edge of the disk. With a old disk this movement doesn’t work anymore. It is stuck. Sometimes a smack on the back of the PowerBook works at start up of the spinning of the disk. I my case it is not enough.

What to do?
You should watch carfully when the disk start to spin. If it starts you genly push the slider to the edge of the disk. You can hold your finger on the green area of the slider or use a screw driver to manipulate. In this way you help the disk over a dead point.

In my case I revived 2 disks like that. A 20 MB and a 40 Mb disk. The third, a 40 MB disk, I only opened and pushed the slider to the edge even without connected it to the mother board. Then I connected it and it started up direct!

On the 40 MB disks I added a drop of Teflon spray to lubricate on the spot of the blue arrow. Not sure I usefull but a smooth movement of the small slider is essential.

Now I have I working PowerBook 100 and two sort of working PowerBooks. The last two have to be warm to start.

Comments Off on Update SCSI disks PowerBook 100

Six PowerBook 100

BIG SUCCES!!!!!!

One of my PowerBook 100 is back from the grave!
Nothing worked but I couldn’t give up….
I know from some electrical parts that they work better if the temprature is right …so I got my wifes hairdrayer and heated the MB a little bit… And…yes! I had a blinking floppy.
Now I’m testing HD’s and found one to work!
YES YES YES!!!

Will post some pictures later.

Booting from the external SCSI disk didn’t work. I got a walking SCSI sign with number 6 and sometimes number 1 in my screen. This stayed also so if I detached the HD but left the adapter in the PowerBook.

To look into….

I have tested 10 LoBo with 10 displays and to my surprise some combinations work. So it must be that bad but not dead capacitors in the display must be helped by a good LoBo and the other way round.

My Powerbook 100 works, except for a small problem where the screen doesn’t show up. I have found out that this is being caused by 8 small electrolytic capacitors on the back of the LCD which have ALL leaked. I have cleaned up the mess, but the capacitors don’t work (no picture on LCD).

I need to know the type of capacitor to replace them with. They are all marked “3.3 3.5V” and the polarity is noted below that. Can I use anything that is greater than this? E.G. would a 16V 33uF capacitor work as a suitable replacement? or should I get the voltage as close as possible (6.3V 47uF)?

There should be a model/type/serial # on the Caps. If you can, Take one to a radio shack and have a tech look it up. I would think that it should be as close to the original Caps. as possible. if it goes to use the Cap. it could prob get a surge.

The voltage listed on the cap is the voltage at which the dielectric breaks down. So it does not hurt to go over.

I always get confused when reading the values on the caps but I think 33uF is correct.

So a 16V 33uF cap is the type to get?
__________________

a replaced the 8 capacitors…

… and the screen now appears: no longer the dreaded dark blue screen. Then I tested this good LCD with some of the spare logic boards that I have in the basement (http://homepage.mac.com/bengi/PhotoAlbum50.html) and I got the dark blue screen, so it means that the same symptom is shared by two different problems: the 8 caps behing the LCD and something else in the LoB

Comments Off on Six PowerBook 100

Macintosh 512K in carrying bag

mac512k016-r1

A perfect catch this week! A 512K, unmodified. In an Apple carrying bag and with a Macintosh External Disk Drive (M0130). Serial C54011PM0001WP

Unfortunatly the Mac inner drive was totally stuck. There was a disk in it and even pushing with a paperclip did do the trick….
I removed the drive and de-greased it and lubricated it again with Teflon very little spray. There was more movement in the drive but not really like it should. I degreased it even more and added some more Teflon. Then I heated the metal parts with a hair dryer…now the movement was OK.

http://www.vintagemacworld.com/400kflop.html

The disk stuck in the drive was an official Mac System disk. System 2.0 and Finder 4.1, English 8690-5003-C
.
The external drive was working but had to be cleaned and lubricated again too.

A real bonus is the carrying bag. Complete with Apple logo and original address label with on the back in red Macintosh.

mac512k023-r


Comments Off on Macintosh 512K in carrying bag

ED

I made some pictures of my Macintosh Plus-ses and ED.

My ED has serial number C8071DWM0001WP and on the back the model is called m0001D.It is Platinum.
I found on this site that there are 5 models:

Macintosh ED
The Macintosh ED [M0001ED] was a 512K/800 [M0001D] packaged for sale through educational institutions. There appear to be four editions of these machines:

– Beige with M0001ED model number. [Serial numbers begin with F, for Fremont, California]
– Platinum with M0001ED model number. [F]
– Beige with “Macintosh ED” printed on the front and M0001D model number on the back. [Serial numbers begin with C, for Cork, Ireland.]
– Platinum with “Macintosh ED” printed on the front and M0001D model number on the back. [C]

Note: I have never seen a M0001ED with a 110-120V power supply.

Macintosh Plus ED
The Macintosh Plus ED was a platinum Macintosh Plus with “Macintosh Plus ED” printed on the

front and a standard 220-240V M0001AP model number on the back.

http://homepage.mac.com/chinesemac/earlymacs/#ED

So mine is mentioned. But what I don’t understand is that the serial has a M0001WP in it…
Normaly that would mean that is was a 512K. But the back says that it is a M0001D.

My Plus-ses are two in beige and one in platinum. The same site tells us:

All original Macintosh Plus [M0001A and M0001AP] machines had the words “Macintosh Plus” on
the front and came with the M0110A extended keyboard. There were three generations:

“Beige” Macintosh Plus machines read “Macintosh Plus 1 Mb” on the back, with no copyright
date. Beige was also the color of the Macintosh 128K and 512K, as well as the 512Ke.
In 1987, Apple changed the label on the back to read “Macintosh Plus 1 Mb” with a 1987
copyright date. The case color was changed to “platinum” to match the color of the new
Macintosh II and SE machines. The owner’s guide was redesigned and revised (see below).
In 1988, Apple changed the label on the back to read “Macintosh Plus” with a 1988 copyright
date. The owner’s guide was redesigned and revised again (see below).

http://homepage.mac.com/chinesemac/earlymacs/#Plus_hardware

One of the Plus-ses is very old. Made in 1985!

Your European Macintosh Plus (M0001AP), with serial number C55135EM0001AP, was the

3652d manufactured during the 51st week of 1985 in ….

The

dscf8116-large

dscf8129-largedscf8129-large

dscf8126-large1

dscf8129-large1


dscf8134-large

Comments Off on ED

NSCA Telnet 2.5 FTP server connected with SLIP to the Internet

In my research on TCP/IP on Classic Macintosh I tried to run NSCA Telnet 2.6 and 2.5 on a minimal system equiped with only 512K. Without any succes…. To run it with System 6 and MacTCP is just to much.

But while trying I found something what triggered my interest. Unlike an older version I have (2.2), or newer version (2.6 and 2.7) NSCA Telnet 2.5 was capable of setting up a SLIP connection (Serial Line Internet Protocol) via a modem or serial cable. The 2.5 version is developed in june ’92, just before Internet got really big.
SLIP was a well know way of connecting to the Internet until the beginning of the ’90. It then was replaced by PPP which is ‘better engineered, has more features and does not require its IP address configuration to be set before it is established’.
So SLIP is an old way of setting up an Internet connection. It is very nice that NSCA has a SLIP client to set up a connection in its software.

For a SLIP connection you need:

  • A Macintosh with at least 1 MB RAM (Plus, SE or upgraded 512K)
  • A serial line; modem or null modem
  • NSCA Telnet 2.5
  • A SLIP provider, Linux/Unix box or OSX to connect your modem or null modem to
  • Install sliplogin on your Linux, Unix or OSX box

MacTCP should be in the System map. You should give it the IP address you want and what fits in your normal internal IP range, in my case 192.168.62.32. The gateway is the Linux box, in my case 192.168.62.31.
Maybe it works with NSCA own TCP stack… Didn’t tested it yet…. For that you have to edit the config.tel file in the same directory as the Telnet NSCA 2.5 program. If you don’t edit something it will need MacTCP.

There is a huge manual available. I make it available in PDF here:

nsca_telnet_25_documentation 

In my setup I used my 512K which was upgraded to 1 MB. The serial line is an null modem cable I made myself (see http://68kmla.org/forums/viewtopic.php?f=7&t=14814 for wiring). I connect this one to a Linux box. On the Linux box I installed sliplogin (sliplogin-2.1.1-3.i386.rpm for Red Hat in my case… but it is available for Mac OSX and other Linux )

Basicly you make a special user which is used to setup the SLIP connect. This user has no default shell but the program sliplogin. My /etc/passwd looks like this. Give this user a passwd and you can login.

stjaap:x:505:506::/home/stjaap:/usr/sbin/sliplogin

Now only give the correct information about the IP address you will receive. This has to be done in /etc/slip/slip.hosts (or sometimes /etc/slip.hosts)

This is the only line I added:

stjaap   192.168.62.31  192.168.62.32   255.255.255.0 normal            60

It means that when user stjaap logs in, the serial port on the server will get IP adres 192.168.62.31 and the client (the Mac with NCSA 2.5 FTP server) 192.168.11.32. Also correct subnet mask is given and a normal SLIP connection with a 60 seconds time out is set up.

If you login a special network device is setup, sl0. This has the same setup as an Ethernet card on a Linux box. You can route traffic true it, use ifconfig, etc.

See this picture:

slip-ftp-sl0

Now we connect our Macintosh to the Linux box. My serial box allows a serial login. I added these line to /etc/inittab

s0:2345:respawn:/sbin/agetty -L 9600 ttyS0 vt100
s1:2345:respawn:/sbin/agetty -L 19200 ttyS1 vt100

I found out that my serial port on the Linux box that works is ttyS1

Start NSCA Telnet 2.5 and fire up your FTP server. That can be done under File /  FTP Enable.

Check your serial port settings. You can find them under Network / Serial Port Settings.

They should fit with your serial settings in /etc/inittab. In my case in /etc/inittab speed is 19200. Settings for NSCA Telnet 2.5 Serial Settings:

19200 baud
8 data bits
No parity
1 stop bit
Modem port
No handshaking
SLIP IP # 192.168.62.32
Open a connection under File / Open Connection and don’t fil in the two boxes Session Name and Window name. Only pick /select the little box before Serial/SLIP and click on OK.

connection-serial-uitsnede
If you are connected to a Linux box and you don’t see any prompt reboot your Linux box. After a while you will see the login prompt. Now login with your special SLIP user, in my case stjaap.
SLIP will be started and on the Linux box sl0 is setup.

Now you start an other connection in NSCA Telnet. This time you can enter a Session Name and Window name. Choose whatever you want or leave it empty as with the first connection. However..now don’t  pick /select the little box before Serial/SLIP! Click om OK and you will see that the Session menu item is not greyed out any more. Select from this Session menu Switch to SLIP .
Now your FTP server is connected over the serial line with TCP/IP!
You could get a windows which says that it can find a certain server or gatway. Just click on it and it will go away. If you leave it open, no TCP/IP connection is possible and your server seems offline.

slip-ftp-ping

A ping from the Linux box and a FTP session

It means that a Macintosh can be an FTP server without an ethernet card or SCSI to Ethernet solution. It also means that you can do file sharing between other computers indepenant from operating system. If you don’t have any mac around you could exchange files like this.

(http://en.wikipedia.org/wiki/Serial_Line_Internet_Protocol)

Comments Off on NSCA Telnet 2.5 FTP server connected with SLIP to the Internet

An original Macintosh 128K as web content management system

I was inspired by the setup of the 512Ke server of Niles of the site Macs, Appletalk, and FTP (http://web.me.com/nilesmitchell/Mac512k … tails.html) to work on a project with my Macintosh. Yes..an original 128K, unmodified not upgraded one. Produced in May 1984 with serial F42103PM0001P.

As always I would like to make something in combination with a web server. Until now my best effort in running a web server on an old Mac is on my Macintosh Plus. I managed to run a web server on a minimal System 7.0 disk with Httpd4mac running on a separate external disk drive. With the help of IPNetrouter the Macintosh Plus is running TCP over LocalTalk. See my article about this one on:
http://www.webservermuseum.org/?p=10
I can also run the web server with a external 40MB hard drive with system 7.0 on it and a DaynaPORT SCSI adapter.

I would like to use the Macintosh as a content management system for the web server on the Plus. On a Macintosh you cannot use any kind of file sharing so I knew that my only option to move files to the Plus would be MacTerminal or equivalent. This was the first telecommunication and terminal emulation application software program available for the Macintosh.
http://en.wikipedia.org/wiki/MacTerminal

So I made a setup to make this possible. First of all I needed a suitable null modem cable. All Macintosh printer cables are null modem cables, so I used one with a DB-9 to DIN-8 connector. On the Macintosh I have a external Apple 3.5 drive, so my storage total is around 1.2 MB. I use the internal drive to boot System 1.0 with Finder 1.0. On the external Apple 3.5 drive I have a disk with MacTerminal 1.1E and MacWrite on it. The settings I use on MacTerminal are:
Connect to other computer, 9600 Baud, 8N1. On the Plus I use Z Term and I use the setting Local Dial without telefone number to connect to the Macintosh. To send a file to the web server I use Xmodem protocol to send and recieve. The file is downloaded in the root directory of the web server. It is also possible to send the files back to the Macintosh.
If I want to edit the html files I use MacWrite. MacWrite can save as text only, so perfect for HTML.
I start Z Term and Httpd4mac from a mounted share on the Plus. On my Quadra or on a Netatalk share on my Linux box.

The only problem in the setup is that in the communication so characters are added to the html file. I’m not sure where this happens, but I guess it is a xmodem problem. The gibberish is added at the end of the text, so the html is still valid and a web page is shown. Any one who knows something about this problem is welcome to give a solution! For now I will xmodem my html file to a mounted folder on my Slackware Linux virtual machine with Netatalk on it. I can make a small cronjob which runs a shell script to clean the html of rubbisch. This wil probably use sed. The command will be someting like: sed -e ’s/<\/html>.*/<\/html>/g’

I send the file 128k.html to the Slackware mounted disk on the Plus and it is immidiatly visible on the webserver.

My next setup will be running a FTP server on a Mac 512Ke. In my next posting I will tell all about it.

Comments Off on An original Macintosh 128K as web content management system

Lisa

Today I acquired a Lisa 2. Well….not really one you can plugin and startup.
It is more a former Lisa. A deciced Lisa….Just everything what could be removed is out. So not much as the monitor is left. I have some questions.

– How realistic is it to get this one back alive. What am I missing. Obvious the CPU board, video board, power suply, floppy drive….Am I missing more?
– Can you tell from the information on the serial number when it is produced? I see Manufactured 3244. Does that mean 1983, 24 week, 4th day?
– What is the information about the model (Model number A6S0300P Memory Option A6S0304 )
– If not possible to restore.is it possible to connect the monitor to any kind of more modern Mac? Like a Plus or a Macintosh II?

Some pictures and the serial sticker.

Model number A6S0300P Memory Option A6S0304


Comments Off on Lisa

TOPS Terminal

One of the oldest TCP/IP applications for Macintosh is TOPS Terminal. It was released in 1988, free of charge, by SUN Microsystems. In the documentation it is told that it will run on these requirements:

Macintosh computer:

– 512Ke, Plus, SE or Macintosh II.
– System 4.1 and Finder 5.5
– Two 800K floppy drives or one 800K floppy drive and a hard disk

Network and/or phone connection to Macintosh.

In the manual it is said:
“The network connection can be an AppleTalk-Ethernet combination or direct Ethernet.
If you do not have a direct Ethernet connection, your
AppleTalk network must be connected to Ethernet through an AppleTalk/Ethernet
gateway (such as the Kinetics, Inc. FastPath product).”

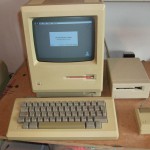
The configuration I used is a 512K upgraded to a 512Ke. That means 128K ROM, a 800K disk drive and 512K memory. For this purpose I have a special motherboard. An original 512K board with only the Mac Snap 128K ROM adjustment on it. See picture:


I would also love to test it on an original 512K with 64K ROM, but I don’t have one. Maybe a nice challenge for one of the readers of this post?

Network

The network configuration I use is as follow:
I connect the Macintosh to a Localtalk network. This can be with Localtalk to a more modern Macintosh like my Quadra with System 7.6 and TCP/IP control panel. Or I connect it with an Farallon EtherPrint to my local Ethernet. In this case only AppleTalk is bridged, no TCP/IP. For this purpose I use IPNetRouter from Sustainable Softworks, the 68K version. Apart from your internal IP adressses you create separate subnet. In my setup my local IP addresses are in the 192.168.62.x range with subnet mask 255.255.255.0. The subnet for Mac’s on the Localtalk part use IP addresses in the range 192.168.60.x with subnetmask 255.255.255.0. The IP address of your Macintosh which runs the IPNetRouter software is one part of the bridge, the IP address of the printer port on that machine is the other part. This pictures shows how to it looks.


You can also copy this configuration file. Or download it: http://macintosh.vanegten.com/start-ipnetrouter
Use this file to start IPNetrouter.
Code: Select all
! IPNetRouter 1.5.4 68K
#forwardingAutomatic
#DNSForwardingOff
#LimitMTUForPPPoE
+interface\Ethernet\enetDRVR0\192.168.62.8\255.255.255.0\
+interface\AppleTalk (MacIP)\ddp0\192.168.60.1\255.255.255.0\masquerading\
+route\Direct\192.168.60.0\192.168.60.1\
+route\Direct\192.168.62.0\192.168.62.8\
+route\Direct\224.0.0.0\192.168.62.8\
+route\Default-Gateway\0.0.0.0\192.168.62.1\
+map\*\192.168.60.1:80\192.168.60.5:80\0\perm\
#end

First uncheck “Only Load when needed in your TCP/IP” control panel. This is only possible Advanced mode. Download IPNetrouter, install it and use this file to open it. If the application is started you can change the IP adresses to your own situation and save this configuration. Then you use that one to start. You also edit it if you feel confident with all the values. The documentation is very complete, so start to read if you have no quick working system….
The brilliant part of IPNetrouter is that it is not necessary to have actually a cable in your printer port. I my situation the 512K Mac is connected to the Ethernet with a EtherPrint box.

IPNetrouter can also run in a virtual environment. I have tested it in Basilisk II. It works, but less stable as on a real machine. You can use the software for one month for free with all the functionality.
To test if everything works fine I would advice to connect a Plus or other Macintosh which works with MacTCP over Localtalk to test your configuration. Use NSCA Telnet, Fetch or MacHTTP to test.

TOPS Terminal and TOPS TCP/IP
You can download the software on this location:
http://cd.textfiles.com/itools/TERMS/TOPSTERM/

The files you should download are:
TOPSTER0.HQX
TOPSTER1.HQX
TOPSTER2.HQX
The files contain also a manual in Microsoft Word for Macintosh divided in two parts. For your comfort I converted them into PDF. You can download them here:

http://macintosh.vanegten.com/tops.pdf
and
http://macintosh.vanegten.com/tops2.pdf

The files you need are TOPS TCP/IP, a control panel to put in your system map and the actual program TOPS Terminal with a help file separate from the program. If you plan to use it you should take care that it is in the same directory.
I have tested it with System 6.0.5 and System 4.1. System 4.1 leaves more memory free for the application.
To configure TCP/IP put the control panel TOPS TCP/IP in the system map and reboot. You will be asked if you need help. Click on No help needed. Then you will be asked if you want to configure TOPS TCP/IP. Click on “Configure TOPS TCP/IP by hand”. Fill in the IP address you will use. Remember that this should be an IP address on the LocalTalk site of your bridge. In my case it is 192.168.60.2. The A gateway is the Macintosh where the IPNetworkrouter is running. Also use the Localtalk site. In my case it is 192.168.60.1. Do not fill in the IP address of your normal (cable) internet router.
The two other valueas are also not very clear to me too. Normaly you would fill in just a subnet mask, like 255.255.255.0. TOPS TCP/IP works with a Subnet Shift and a Subnet Size. My experience is that if you remove the small cross in “Are subnets in use locally?” and fill in as value for Subnet Shift 8 and Subnet Size 32. It works….
If anybody knows what is means..you are welcome to leave this as a comment on this article!
If you want to do later changed do this in the control panel. Reboot the system after you changed IP values.

Basically TCP/IP is now configured and you can fire up TOPS Terminal. If you start it you will see the logo. Just click on it. To make a fast connection go to the Network item in the menu and choose Terminal Session for a Telnet session or File Session for a FTP session. Terminal is most simple so we start with this. Select manual TCP/ IP and click on connect. You will be asked … “What kind of terminal should be emulated”. Choose for vt100 or vt102.
Then you can fill in an IP address to connect to. Fill this in in the small area on the bottom. If you don’t have a telnet server on your local network you could try 68.114.128.25, an Amiga BBS. You can also install a chat/telnet server program like Chat 2.1 on your Macintosh (http://archive.info-mac.org/_Communication/_MacTCP/chat-21p12.hqx).

To start a FTP session choose for File Session from the Network menu. You will be asked for user name and password. You can ftp to IP address 194.109.21.26 to test. Login as anonymous with your email as password. On this server you will find welcome.msg, a small text file you can download.
Downloading you can start if you are logged in. Go to Network / Recieve File. A download menu will be given. For all options, see the manual. To Upload a file, use Send File. Remember, you should have write permissions on the FTP server to do so. This is not the case on the server 194.109.21.26.

TOPS Terminal is a beautiful application from the 80’s. It is really “pre MacTCP area”. It can work with 512K memory and the control panel is only 50K overhead. It is not for the faint at heart although… First you have to configure IPNetrouter and then setup TOPS TCP/IP. But when it works it is a very nice early Internet time journey!

Some warnings.

– When you start a connection it sometimes hangs. If you press enter in the hope something will happen..you only hear a beep. My experience is that fiddling with MacPing 3.0.3 helps. Firsts scan your total AppleTalk Zone and then scan your IP devices. Sometimes repeat this. With System 4.1 you will get no reply…but it will trigger IPNetrouter to setup the connection! Out of every 4 connections I need to do this one time.

– 512K is not much. You can setup 1 or maybe two connections simultaneously. TOPS Terminal will warm you if memory gets to low, or will gray out options.

– If you are interested in which ports are open and you preform a nmap lookup on your Linux or Mac OSX box.. TOPS Terminal will crash..

Be patient…


http://cd.textfiles.com/itools/TERMS/TOPSTERM/

Comments Off on TOPS Terminal

« Prev - Next »